
Arbitr Project
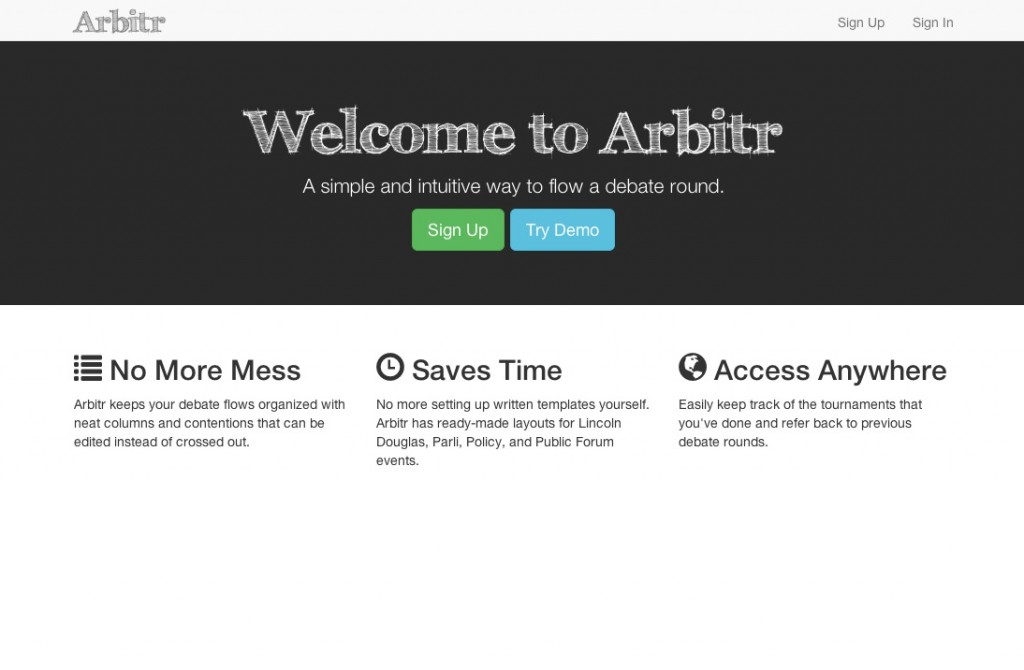
The final project that I created in WDI was an app that had been on my mind for quite a few months because it was an app that my husband, Jesse, had been wanting someone to build since February 2013. He is an assistant debate coach and spends most of his weekends during the school year at Debate Tournaments. There is a particular way that both the judges and the teams track debate rounds and they are referred to as flows. A textbook shows an example of a flow as this:

When in reality they end up looking more like this in the heat of the round:
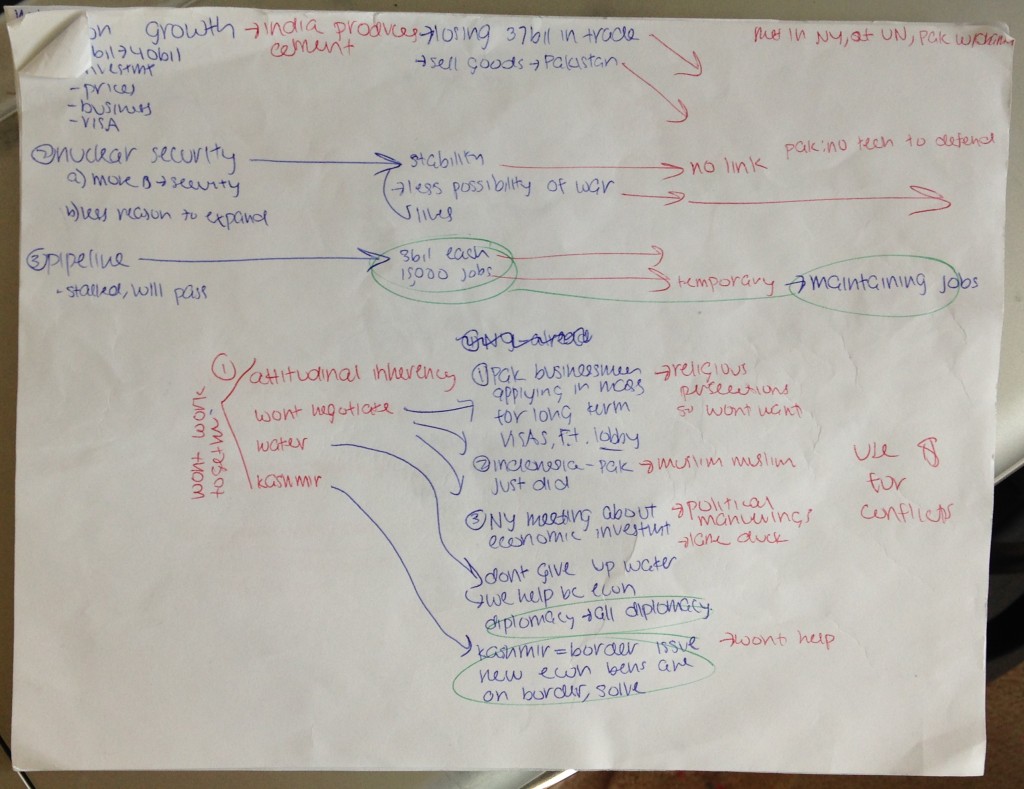
So Jesse had looked extensively to find a better tool for flowing a debate round. Some people tried to use Excel, but most people just settled on handwriting everything. Being unable to find any kind of software or tool that was ideal for the situation, Jesse decided that someone needed to build an app for this and he knew that if effective, it would become a popular tool.
I thought about creating the app for him for the first WDI project, but mistakenly thought it would be way too easy to build and therefore wouldn’t be a good project during the program. By the time the final project rolled around I knew enough to know that the app would be far more complicated than I had originally anticipated, which made it a great final project. We were also lucky enough to have 2 weeks to do our final project, instead of just the single week we had with the previous two.
Project Planning
I spent the entire first weekend project planning. I had already been compiling ideas, and had a good idea of what technologies I was going to need. I planned on using Backbone.js even though I had struggled with it the week we learned it in class, because I knew the app would be so client-side heavy and need to be really responsive to user input and actions. One of the reasons I had struggled with it in class was because we learned it in CoffeeScript, and I wasn’t comfortable with CoffeeScript at all, and often only understood what was going on when I looked at the compiled JavaScript versions. So I was very conflicted as I was about to start this project. Did I want to re-learn Backbone.js in vanilla JavaScript and probably understand it better? Or did I want to struggle and try to learn it again using CoffeeScript? I ended up deciding to push through and continue with CoffeeScript. I was very worried that I would regret this, but luckily this awesome site saved me whenever I couldn’t figure out exactly how to write something in CoffeeScript.
I also was initially conflicted on what I was going to use as the back-end. Of course Rails would be a natural choice because everything was so Rails focused in the program, but I was highly considering Node.js as a better option, or possibly not having my own back-end at all and interfacing with a Parse cloud database instead. I wanted to use the best tools for the job instead of just settling on what I already knew, but after discussing it with an instructor it became clear that Rails would be the best option for the time being, since it could possibly take me the entire 2 weeks to get comfortable with Node.js, and with Parse I wouldn’t have any work to show for the back-end.
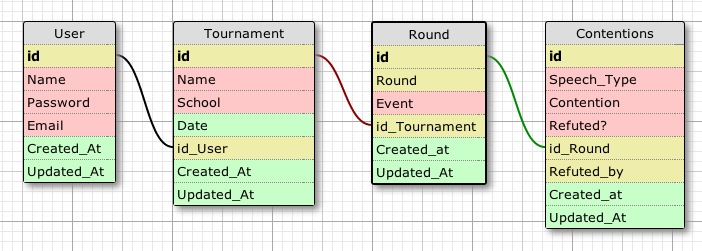
During the weekend of planning, I hit a huge bump with the data modeling. After discussing with Jesse more of the details surround the Debate events and what kind of interactions the site would need, I spent an entire day just working through how to do the database schema and object models, and at one point worried I would have to abandon the project because it’d be too complicated. After many pages of writing as I worked through it I realized I had been thinking about it the wrong way and came out with something much simpler than I thought it’d be.
Project Week 1
With the initial planning stage over I was ready to start fresh on Monday morning with setting up the Rails project, and starting on the Rspec tests as I built out my models. That went pretty quickly since it was all things I had already done many times before, but then came the hard part of starting to set up the Backbone framework on top of Rails and start building it out. I found these Railscasts very helpful in the initial set up, especially since it was in CoffeeScript, but I later ran into problems when trying to follow it too literally and had to branch off to do things my own way.
The first few days with Backbone were pretty rough. It wasn’t necessarily Backbone itself that was so difficult, though of course I was still learning it so extra time was involved in that, but getting Backbone to talk back and forth with Rails took up a lot of initial time and I ended up queueing myself for help from the instructors at least once every hour. Those first couple days I was only concentrating on getting the user accounts and sessions set up with Backbone and had to figure out the best way to pass variables to the front-end so that the page would recognize whether there was a current user or not and act accordingly. I ended up going with the Gon gem for that, though I continued to have problems with finding the right place in the Rails controllers to set it so that it knows to update itself when things change.
After the first two days of actual coding all I had was the back-end set up for users and sessions and just enough Backbone set up on the front-end to log in and out of the app and set up new users. I felt like progress was going too slowly but those first couple days struggling with getting Rails and Backbone to work together were so important to the learning process and I had a lot fewer issues after that because I was getting into the swing of things and was able to concentrate more fully on Backbone. One big problem I had though, that was related to Backbone, is that I couldn’t get the Routers to work successfully unless it was all in the same Router. An instructor advised against using the built in Routers and pushed me towards using Page.js, which ended up being pretty user-friendly and has worked pretty decently.
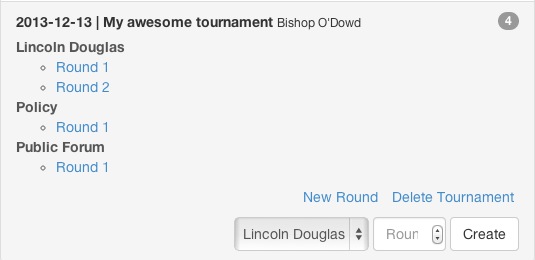
I had 3 main parts I needed to create and each one went one level deeper under the other so I started at the top level, working on setting up Tournaments in Backbone, which was one of the easier parts: allow people to add a tournament and it would display in a list.
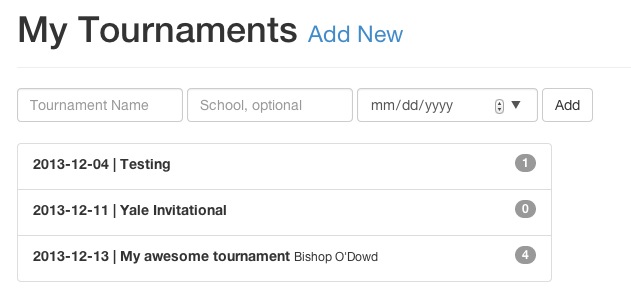
The biggest challenge I ran into on this part was getting the tournament list to sort by tournament date instead of tournament id. This is something that would normally be very easy if you’re just doing it in Ruby, but since Backbone has its own collections that it refreshes on a regular basis, it’s a little trickier…or so I thought. I kept trying to use .sortBy after the collection is fetched but was having no luck getting it to reflect the way I wanted it to sort. It turns out that Backbone actually has a built in property that makes it easy peazy to automatically sort a collection by whatever field you specify: the comparator property, which is ideal because whenever you add a new item to a collection it already knows that it needs to be sorted that way and inserts the item into the correct spot in the list.
class DebateJudge.Collections.Tournaments extends Backbone.Collection
  url: '/api/tournaments'
  model: DebateJudge.Models.Tournament
  comparator: 'date'
The next part to work on was Rounds to go beneath each of the Tournaments and that ended up taking up the last couple days of the week. The Rounds index underneath each of the tournaments included event categories: Lincoln Douglas, Parli, Public Forum, and Policy, and any time a round was created it needed to go under the correct event, so there were lots of collections involved.
One of the huge hurdles I crossed concerning rounds was problems with loading and refreshing data since it was doing it asynchronously. The DOM wouldn’t be loaded yet and my Backbone views would be trying to append data and HTML elements to other elements that didn’t exist yet. The real life saver with this was telling the Backbone views to specifically append to “this” view element that was going to be loaded. So it would append to that view’s element before it tried to load that view on that page. An example:
appendTournament: (tourney) =>
  rounds = new DebateJudge.Collections.Rounds @rounds.filter (round) =>
    (round.get 'tournament_id') == tourney.id
    view = new DebateJudge.Views.Tournament(model: tourney, collection: rounds)
    @$('#tournaments').append(view.render().el)
Since the #tournaments element refers to an element that lives inside the template of the view, the @ symbol (which refers to ‘this’ in CoffeeScript) solved the append issues. Another really great benefit of specifying to look for a DOM element within that Backbone view, as opposed to the entire DOM is that when you’re toggling an element by classname it will target only the one that was generated by that view instead of every element with that classname. This was very important since I have so many views that are being generated with the same classname, such as rounds, or contentions within the rounds, that need to be interacted with separately.
Project Week 2
The next part that I needed to work on was really the most important part and the beef of what the site was all about: the Round page where all the action would be taking place. Before I even started working on the contentions that would be within each Round, I had to create the view for a Round and the workspace that the contentions would eventually be in. I spend an entire day just working on the CSS that would be this page. I knew from before I even started working on the project what I had in mind for the Round workspace. I have not yet mastered drawing with my huge stylus on my iPad mini, so this was my original messy sketch:
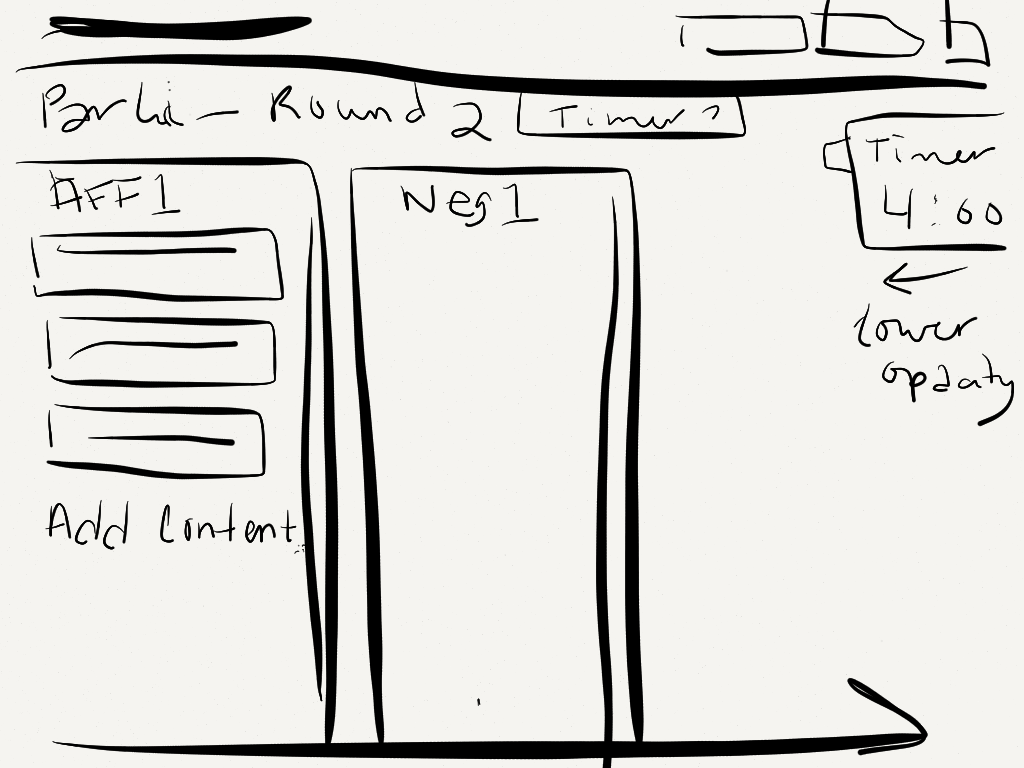
All the events have a different amount of columns and at first I thought I was going to have to create a different template for each of the event categories, but luckily I realized before I started coding it that that would be too much duplicate work and was able to create just one view template that would be able to generate the different layouts for each of the events. Where the difficulty with the CSS came in is that I knew I needed a page that was going to be able to scroll horizontally to be able to accommodate a varying amount of columns, and that it couldn’t just wrap because the columns themselves would be varying heights and the user would need to be able to always compare one column with the next one. So I needed the page to scroll horizontally, and I needed each column to be a somewhat set height and have its own scroll bar so you wouldn’t have to worry about the page getting so long that the user would have to scroll up and down.
Having been a heavy-duty user of Trello for 2 years now, it ended up being a huge inspiration for me because their layout is extremely similar to the layout that I wanted to create for my app, but creating that kind of layout is not as easy as it might seem. You definitely need an excessive use of divs and I thought I could get away with having the bare minimum but alas, I had to appease the powers that be. After spending most of a day just working on perfecting the CSS for the layout I ended up actually forcing myself to say, “That’s good enough for now,” because I couldn’t get the bottom to be responsive, which is really important, but I needed to move on to other things because of the time constraints.
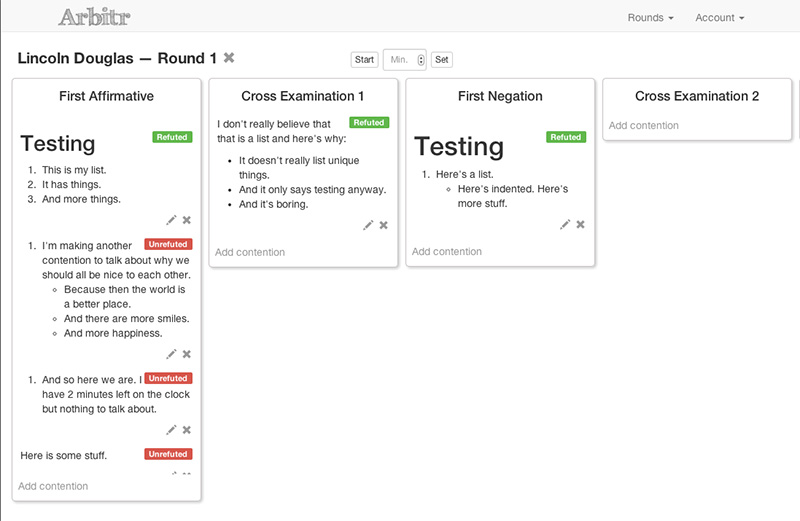
After that I had 3 days left before the project was due and started into high anxiety mode of needing to use the rest of my time as productively as possible. I still had to create the last piece of the puzzle: the contentions. All the individual little pieces of text that were really the most important aspect of the entire thing. Creating the contentions is their most basic form was not difficult because it’s the same idea I’d already been doing over and over—let the user create information and immediately add it to the page. The real work though was adding all the features to the contentions that would trump working it all out on paper.
One issue I ran into immediately was that there wasn’t a straightforward way of specifying in the automatic call to the API that I wanted only the contentions for a specific round. The best I could do at the time was get only the contentions for the current user, which means that a lot of unnecessary data is being loaded for each Round page and could very well get out of hand if the user uses the site enough. This obviously needs to be fixed and would probably just be a matter of passing a parameter to the API that it could use to filter the contentions, but since it didn’t interfere with the site working at the time, I pushed onwards.
After the day of getting the contentions to work in their most basic form I decided to do my initial deploy to Heroku in order to have time to troubleshoot any issues that arose in production, and that took the rest of the evening and the next morning. The first problem I had with the deploy to Heroku is one that I was familiar with because of the same problem with the group project I had done previously. The Rails helpers that are supposed to automatically find all the CSS & JS assets in the html header weren’t doing their job, so I had to manually go in and specify the files. With that fixed the second issue that stumped me was that some of the page was showing but not all of it. I figured there must be something weird about deploying a Backbone.js app to Heroku but when talking to a classmate who was also using Backbone.js she said that she didn’t have any issues, so I delved deeper. It turned out to be a simple case of having broken something that was previously working and not realizing I had broken it because I hadn’t looked back at it in a while.
After fixing those bugs I spent the rest of the day finessing the contentions. I made the contentions editable, deletable, and added in a label that could be toggled showing at a glance whether a contention had been refuted or not. I also added in the ability to delete rounds, if need be. There were tiny hiccups here and there for but for the most part that all went smoothly. I also realized that I should probably have some kind of splash page so spent the final part of the day rearranging some of the code in order to add a very basic page that I planned on fleshing out later.
On the final day of being able to work on the project I decided that I would only let myself work on additional features for the first half of the day and then concentrate on styling and bug fixing for the rest of the time. The two big features I had on my agenda were a timer and the ability for users to enter markdown into the contention fields. The timer was a feature requested by Jesse from Day 1 because teams keep their own time during a speech and signal each other if it’s about to run out. Six months prior to starting on the project I had planned on writing my own timer for it, but a classmate had come across a timer in October that was exactly what I needed, so I had already looked into that and played with it a little. I figured the timer would be quick and easy for that reason and that the Markdown feature would take up most of the morning, but it ended up being the other way around.
I had no problem getting the timer to work when I was playing with it in a simple html page and js file, but had to invoke the function in a different way in my Backbone app in order to get it to function properly. I also had to add in ways for the user to be able to set the time over and over, since the time for each speech in a round varies. It all ended up working out beautifully after the initial struggle.
The markdown was necessary because in basically all scenarios of debate judging the user is going to want the ability to use bullet points and separate paragraphs rather than having some large chunk of text that’s not easy to read at a glance. I was worried that it would be difficult to implement, but was fairly simple and took hardly any time. I had spent a lot of research time leading up to the last day figuring out the best markdown method to use and decided on Markdown.js. It was everything I wanted and easy to implement. Besides adding in the .js file, all I had to do was create this function to use on each contention as it gets rendered on the page:
applyMarkdown: (value) ->
  @$('.markdown').html(markdown.toHTML(value))
From there on out it was all bug-fixing and styling and showing it to Jesse when I got home that evening and then doing a ton more styling changes after getting his feedback. There was so much more that I wanted to do with it but the MVP to present to my class the next day was finished. I did my final push to Heroku and refused to let myself pick at it the next morning as we were waiting for presentations to start.
I spent my entire presentation time giving a tour of the app and talking about what it does, as well as explaining all the Debate stuff, and then ran out of time so I didn’t get to show any of my code to my classmates. The feedback was overwhelmingly positive, however, and I was surprised by it. I figured that this project would be the one that was least interesting because it’s such a niche thing, but it was my only project that people came up to tell me they liked, and I discovered a few people who used to be debaters in high school and/or college. It was a great way to end to the bootcamp.
What’s Next
I have a wishlist of features that I’m continuing to implement whenever I have a moment as well as a long list of bugs to fix. Here are some of the features I will be adding in the immediate future:
- Offline Storage
- This is necessary because the teams don’t always have wifi at the location of the tournament. I plan on implementing HTML5 Local Storage features that will sync back up with the server whenever online.
- Email for forgotten passwords
- Visual link between contentions
- The user needs to not only be able to designate which contention refuted another contention, but a visual link needs to be made so this can be quickly determined. I plan on either using the HTML5 Canvas or D3.js to draw lines between the linked contentions.
I’m dedicated to this project and am excited that it’s going to get a lot of use very quickly as the debate season starts back up. Anyone interested in following along can find it on Github here.